What you need:
paper-copy paper, paper bags, colored napkins-not glossy paper or newspaper
water
Elmer's glue (if you'd like to add it, not necessary)
glitter
plant leaves
dried flowers or other things to add to your paper
Tools and supplies:
buckets
blender
kitty litter box or dishpan
mold and deckle (look this up, can be made at home with picture frames)
felts (or other material for couching the paper)
newspaper
2 boards (12"x12")
C-clamps
sponge
straight edge (for taking water out of paper)
clothesline
iron
Begin by taking your used paper and tearing it into bits. I put mine by color into different buckets. Six pieces of paper make about 3 pieces of new paper.
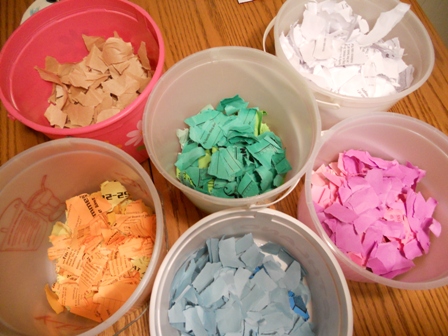
Add enough water to each bucket to cover the paper plus two inches. Let this set for a few hours.
Now put a couple of handfuls of this paper into the blender. Add 2/3 s again as much water as paper scraps. Blend on high until it forms a slurry.


This is what the white pulp looks like. Add water to this until it's about2 1/2"-3" deep.


Here's my couching pad.


For a smoother finish I place a hard plastic film on top to be pressed into the paper.
Here's some made with the green pulp with the film on top.

After you've made all of your sheets of paper, stack them evenly, with the couching felts, one on top of the other. Place extra felts on top and bottom. Put one of your boards on the bottom and one on top and use the C-clamps to compress the pile as much as possible.

Take the stack apart and hang your damp paper, on or off of the felts on a clothesline to dry. I placed this batch on the basement floor because when I tried to hang it, it wanted to come off of the felts.
Once it's dry, carefully remove from the felts.
Now, place a piece of paper under the new paper and one on top. Turn your iron to a low setting and iron the paper to help it stay flatter.


This piece was a lot brighter when it was wet. The colors didn't show up as well as I'd hoped.

This isn't a good picture, but you can see the different colored spots in this piece. This one I'll use for a baby shower card.
There, that's it. There's so much you can do with this. You can make paper out of fruits, vegies, straw, etc. You can put dried flowers or herbs into it. Use a doily to emboss it. So many options, so little time.
3 comments:
I have never thought of doing this how cool,to make your own. I'm going to check it out and try it. Thank you. and thank you for visiting my blog :)
I really like the one with all the rainbow colors and the one with the fern on too. I have seen some paper made by members of the local "fiber guild" but really had no clue how to go about it. Very interesting. :)
Blackberry-I hope you do try this. The paper is also great if you scrapbook or stamp.
FoxyLady-What kinds of fiber does the fiber guild use for making paper? Do they use wools and such too?
Post a Comment